Home Page |.Printable Order
Form | ArtType Extra | Contact
| Order
Working With Beveled Fonts
and Fountain Fills
Use your Fountain Fill Tool to create even more striking effects with
Beveled fonts. Fountain Fill Effects may work differently in some design
programs, this tutorial is using CorelDraw8. If you are not already familiar
with Fountain Fills, check you software manual for more detailed instructions.
Start by stacking and then changing the fonts as shown on the previous page. Any colors will do for
now just so we can see the different fonts.

Your background color will effect your color choices for the base font.
Black or a dark shade for light backgrounds and white or lighter color
for dark backgrounds. A solid color is fine, but you can also use a fountain
fill.
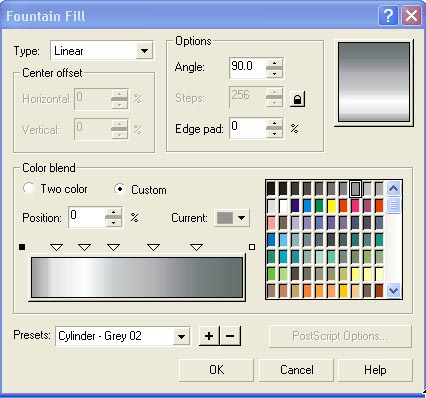
1. Select the base font, shown in black above. Open the Fill Fly Out
and click the Fountain Fill option. There are many Presets available to
choose from or create your own. If you create your own fill, it can be
saved by clicking the + next to the Preset window. Here we will use the
Cylinder - Grey02 preset. Set the Angle to 90 and click OK.

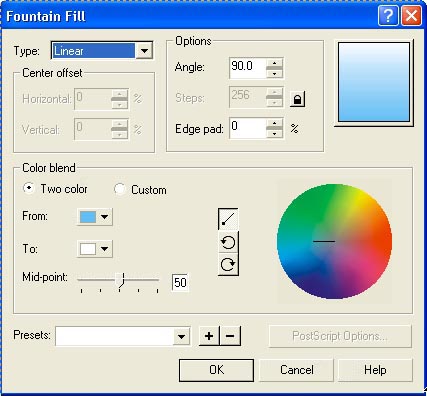
2. Now select the Bevel 1 font, shown in white above. Again, open the
Fountain Fill window. This time we will create a simple 2 color fill. We
want to keep this fill light as it represents the highlight of the bevel.
Click the "From" drop down menu and select a very light color.
For this tutorial we are using light blue. Click the "To" drop
down and select white if it is not already selected. Set the Angle at 90
and then click OK.

Sometimes the effects of the colors can be enhanced by converting the
bevel to curve, break apart and then group it. This will give a separate
blend to each piece of the bevel instead of the whole .
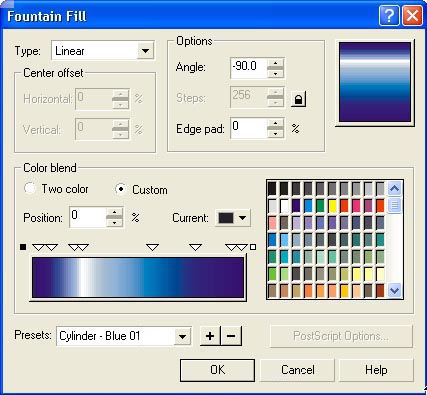
3. Next select the Bevel 2 font, shown in light gray above. In the Fountain
Fill window select another Preset or create your own. This Preset, Cylinder
- Blue01, will be set at a -90 Angle, click OK.

And again we convert the Bevel to curve, break apart and group it.
4. For the last Fill select the Face font shown in dark Gray. Repeat
the process used in Step 2 to create a simple 2 color fill.

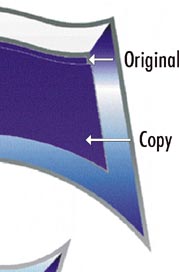
Your can create more dimension using the Trim tool to create a bevel
shadow. Select the Face fonts again. Under the Edit menu select Copy,
then Paste. Move the copy very slightly down and to the right.You
can do this using the arrow keys or just drag and drop. Careful not to
move it too much, we only want a small shadow. With the copy selected go
to the Arrange menu, select the Trim tool.The Trim window will open,
Click Trim and then select the original. Now delete the copy. You
should now have the trimmed off top portion of the original. Change the
color to black and it should look like the illustration at right below.
To get the Face font back in place, select the shadow that was just
created. Under the Arrange menu choose Order and To Front.
Under the Edit menu select Paste and this should put the Face font
back on top, now go to the Arrange menu again and choose Order and
Back One.
Have Fun! There are endless possibilities.

Home Page |.Printable Order
Form | ArtType Extra | Contact
| Order